Træfik, reverse proxy, HTTPs and more
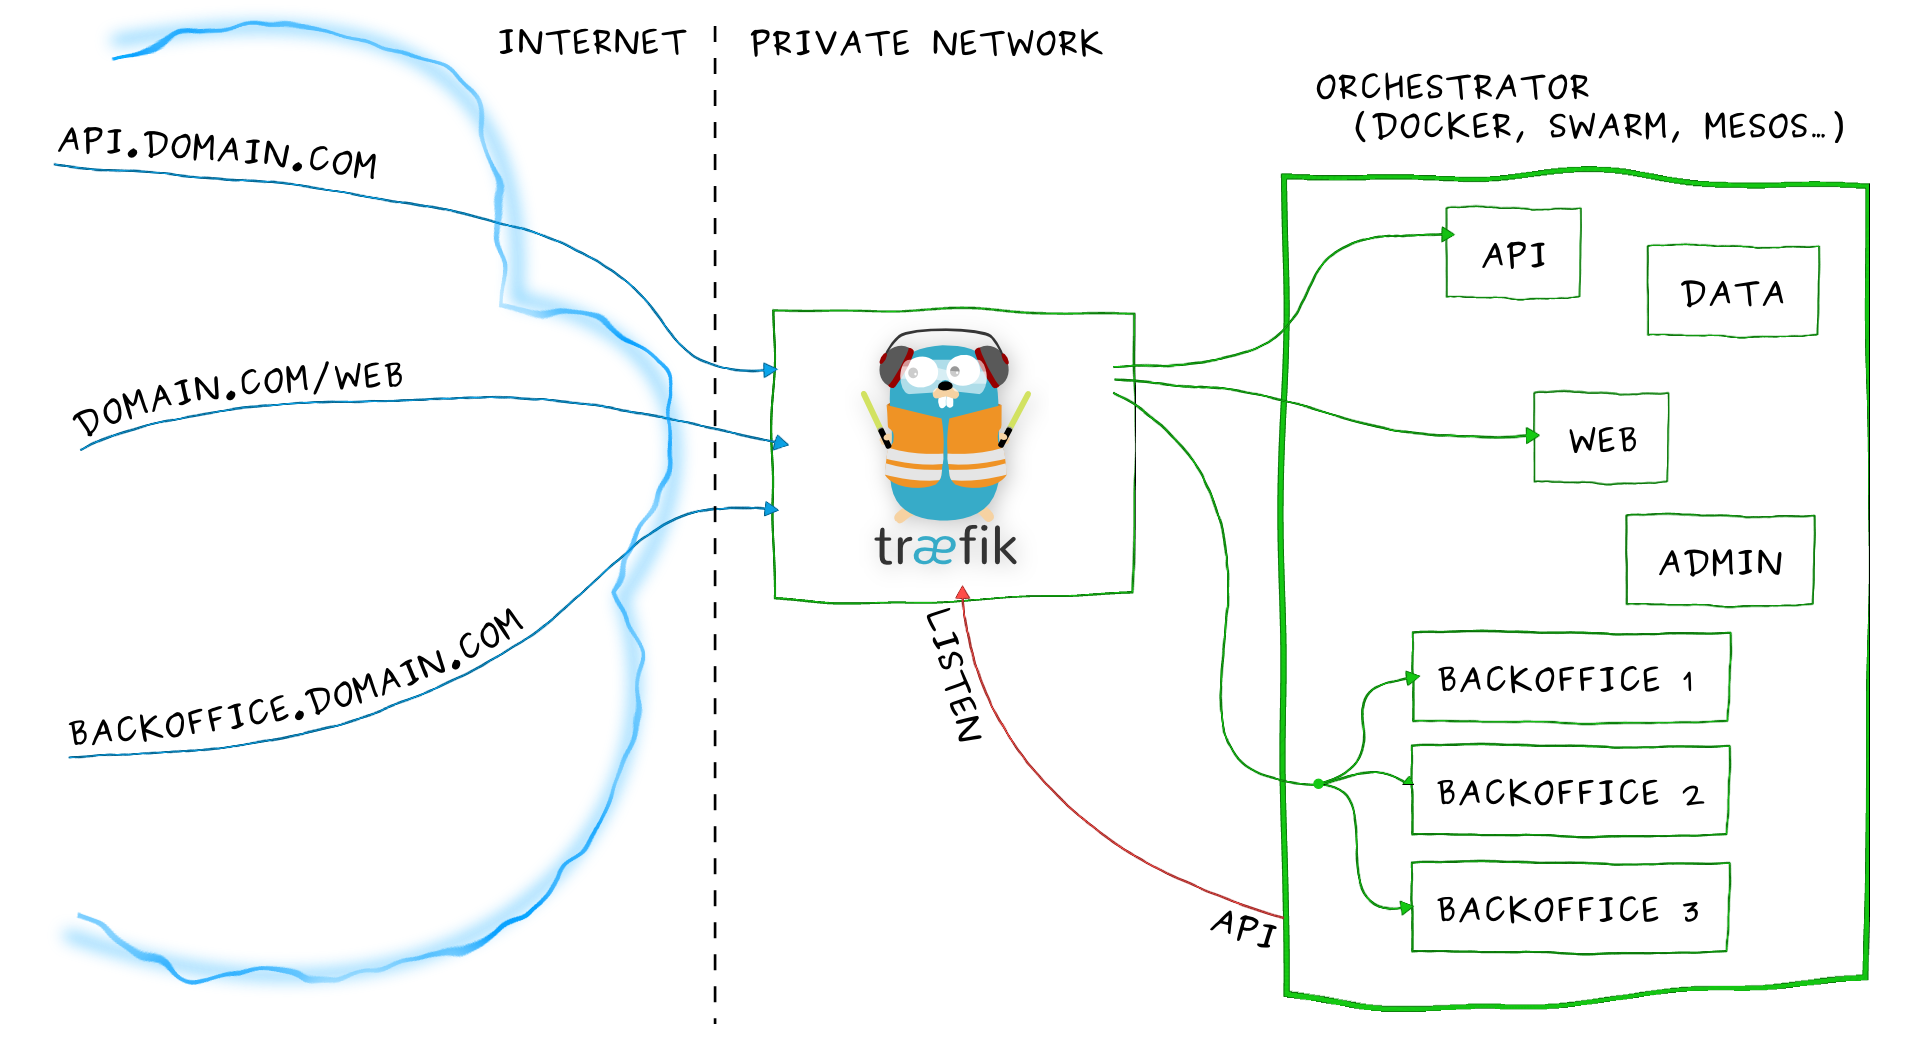
I stumbled upon Træfik last week while working with a client. It is a lightweight, robust HTTP reverse proxy and load balancer.
Træfik is simple enough to get started with, within minutes and offers a variety of features such as:
- Deploy Traefik using a tiny go binary or docker image.
- Serve as a reverse proxy for multiple micro-services.
- Supports several back-end systems such as Docker, Kubernetes, Consul, Amazon ECS and more.
- Reload configurations without restarting process.
- Add proxy SSL support with Let’s Encrypt.
- Add load balancing.
- Provide access logs and metrics; dashboard with a clean UI
- Cluster mode for high availability.
To sum it all up, Træfik is a great tool to serve and manage multiple micro-services or web applications while ensuring high availability, fast speed and continuous deployment.
To demonstrate the robustness and simplicity of traefik, we will try to setup two services with reverse proxy and SSL support. We will host the services on different subdomain on a local machine.
What are we aiming for?
Setup gitlab and nextcloud on a local machine on different subdomain with SSL support to demonstrate dynamic config reload, docker backend support, proxied SSL and reverse proxy capabilities of Traefik.
- gitlab is an open source VCS similar to github
- nextcloud is open source file host similar to dropbox
I picked up gitlab and nextcloud for this exercise because these are two prominent services often deployed within an organization for internal use and can be a nuisance to setup as both compete for port 80, gitlab offers SSL support out of the box whereas nextcloud depends on a reverse proxy for SSL support.
As Traefik supports docker among several other back-end systems, we will attempt docker based deployment of these services.
What do we need to begin?
Before we being, we’ll need docker host up and running on the target machine, SSL certificate and key (self signed or otherwise) and some free time to glance through Traefik docs.
To generate a self signed certificate, check out: https://devcenter.heroku.com/articles/ssl-certificate-self
Start deploying microservices
-
Create a traefik config file:
traefik.tomldefaultEntryPoints = ["http", "https"] [entryPoints] [entryPoints.http] address = ":80" [entryPoints.http.redirect] entryPoint = "https" [entryPoints.https] address = ":443" [entryPoints.https.tls] [[entryPoints.https.tls.certificates]] certFile = "/etc/traefik/server.crt" keyFile = "/etc/traefik/server.key" [web] address = ":8080" [docker] domain = "docker.localhost"The config file:
-
accepts http and https traffic
-
routes all http traffic to https endpoint
-
adds self signed certificate and key
-
Enables [web] i.e. Traefik dashboard at port 8080
-
Enables [docker] backed and sets the main domain to docker.localhost
More information on traefik configs can be found at: https://docs.traefik.io/configuration/commons/
-
-
Start the traefik docker container:
 ssl_cert=`pwd`/server.crt
 ssl_cert_key=`pwd`/server.key

 docker run --detach \
   --name traefik \
   --publish 8080:8080 \
   --publish 443:443 \
   --publish 80:80 \
   --restart always \
   --volume $PWD/traefik.toml:/etc/traefik/traefik.toml \
   --volume $ssl_cert:/etc/traefik/server.crt \
   --volume $ssl_cert_key:/etc/traefik/server.key \
   --volume /var/run/docker.sock:/var/run/docker.sock \
   traefik:latest
The run command:
-
Publishes port 8080 for dashboard and 80, 443 for http/https traffic
-
Makes traefik.toml file available to container.
-
Makes cert/key available to container. Note that
traefik.tomlpoints to this location for SSL cert/key. -
Makes docker.sock file available to container. This is how traefik automatically picks up and publishes new containers. For different back-ends, traefik supports other kinds of discovery including REST api.
Once docker run command executes successfully, you should be able to access traefik dashboard at http://localhost:8080.
-
-
Start nextcloud docker container:
 docker run --detach \
   --name nextcloud \
   --label traefik.port=80 \
   --restart always \
   --volume /srv/nextcloud:/var/www/html \
   nextcloud:latest
The run command:
-
–name: names the container
nextcloud. Traefik uses container name and the domain specified intraefik.tomlfile to come up with subdomain for the container. In this case, the subdomain where nextcloud gets served isnextcloud.docker.localhost -
–label: Tags port 80 to be used by traefik for routing. By default, traefik will try to get the first port exposed by container and try to route http/https traffic to it.
-
–volume: Adds persistent storage to nextcloud container. More container specific options can be found at: https://github.com/nextcloud/docker
If you visit traefik dashboard at http://localhost:8080, you should be able to see nextcloud container automatically added to dashboard.
If you head over to https://nextcloud.docker.localhost, you should be presented with nextcloud UI.
-
-
Start gitlab docker container:
Alright, let’s get the second container running to see how easy it is to route different services with traefik
 gitlab_path=/srv/gitlab

 docker run --detach \
   --name gitlab \
   --label traefik.port=80 \
   --restart always \
   --volume $gitlab_path/config:/etc/gitlab \
   --volume $gitlab_path/logs:/var/log/gitlab \
   --volume $gitlab_path/data:/var/opt/gitlab \
   gitlab/gitlab-ce:latest
The run command:
-
–name: Names the container
gitlabwhich results in target subdomain beinggitlab.docker.localhost. -
–volume: Adds container specific options such as volume mount paths found at: http://doc.gitlab.com/omnibus/docker/
-
–label: Tags port 80 to be used by traefik for routing. Tagging a port was useful in this case because gitlab container exposes ports 22, 443 and 80 and traefik was picking up port 22 and forwarding all traffic from gitlab.docker.localhost to port 22 of the container which kept resulting in an ISE.
-
At this point, you should have the two services being routed through traefik with SSL support available at https://nextcloud.docker.localhost and https://gitlab.docker.localhost and traefik dashboard, available at localhost:8080, should look something like this:
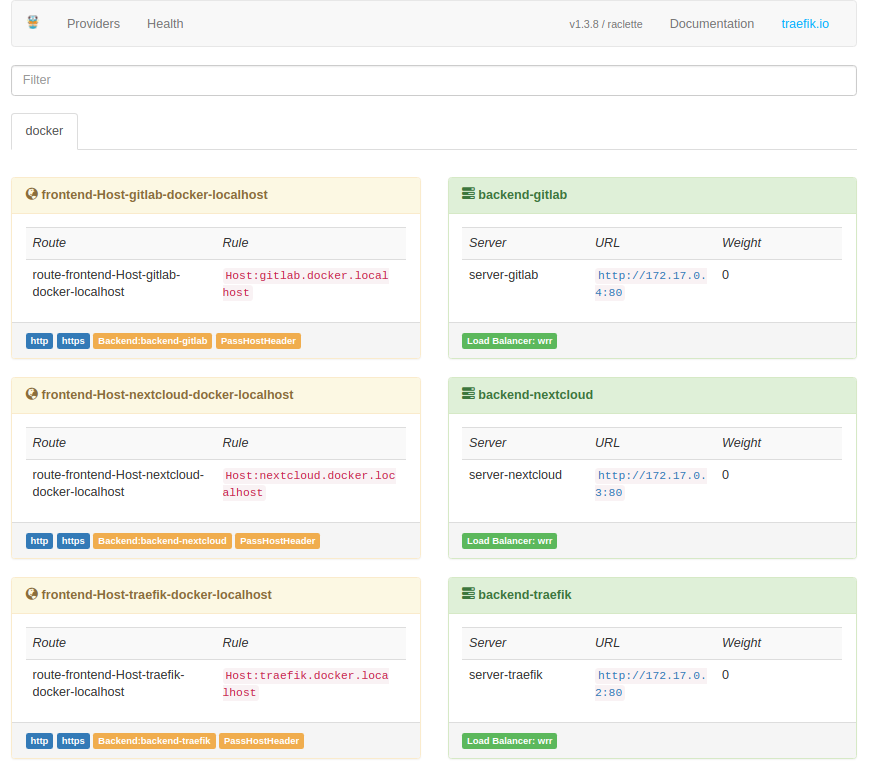
Try exploring the “Health” tab on dashboard and see what kind of metrics it offers.
Conclusion
With this exercise, we observed that traefix automatically picked up and published new services to a different subdomain along with SSL support and load balancing.
Traefix shows logging and metrics about service health and status on dashboard.
Traefix is simple enough that getting started and deploying multiple services, only takes a few minutes yet robust enough to offer wide range of features and configurations.