Puppeteer - quick start guide
Puppeteer: quick start guide
The team behind Google chrome has recently released puppeteer, a nodejs library for controlling Chrome headless. Chrome headless was first shipped with Chrome v59 and has been a huge success with browser automation and testing community.
This post is a guide to quickly getting started with puppeteer and headless chrome for browser automation, testing and web-scrapping.
Quick start
Begin by installing nodejs version 7.6 or later. I use nvm to install and manage different versions of nodejs and it works great!
With nvm, installing and switching to a version of nodejs is as easy as:
nvm install v7.6.0
Alternatively, install nodejs v7.6 or above using official installers which can be found here: https://nodejs.org/en/download/
Create a project and install puppeteer
Begin setting up a new nodejs project
mkdir puppet
cd puppet
npm init
npm i puppeteer --save
This might take a while as it installs puppeteer and downloads recent version of chromium which is saved locally inside node_modules/puppeteer folder.
Start simple: visit a webpage
With project set up and puppeteer installed, let’s dive into first example.
Create a file example.js with following code:
const puppeteer = require('puppeteer');

(async () => {
    const browser = await puppeteer.launch({
        headless: false
    });

    const page = await browser.newPage();
    await page.goto('https://www.example.com');
    console.log('Page loaded');

    //browser.close();
})();
Run the example:
node example.js
Output:

If everything goes well, you should be able to see a new chromium window pop up and load www.example.com.
Notice how we commented out browser.close() and set headless to false.
-
Setting headless to false makes puppeteer run chromium in headful mode which is good for visual debugging or observing what goes on when a puppeteer script executes.
-
Commenting out
browser.close()prevents the browser from closing at the end of script execution. This is also helpful while troubleshooting.
Lookup cat gifs
Alright, now that we know the basics of creating, executing and troubleshooting, or at least observing, a puppeteer script, let’s try automating some common tasks.
Create another file cats.js with following code:
const puppeteer = require('puppeteer');

(async () => {

    const browser = await puppeteer.launch({
        headless: false
    });

    const page = await browser.newPage();

    // Go to images.google.com
    await page.goto('https://images.google.com', {
        waitUntil: 'networkidle'
    });

    // Focus on input box
    await page.focus('input[name=q]');
    // Type some stuff
    await page.type('cat gifs');
    // Press enter
    await page.press('Enter');

    //browser.close();
})();
Run the script:
node cats.js
Output:

We just added a few function calls - page.focus, page.type, page.press and got some cats in return. Sweet!
So how exactly did we look up cats?
-
Go to https://images.google.com
 // Go to images.google.com
 await page.goto('https://images.google.com', {
     waitUntil: 'networkidle'
 });
The
waitUntiloption makes puppeteer wait for all network requests to finish i.e. all js, css, images are done loading. -
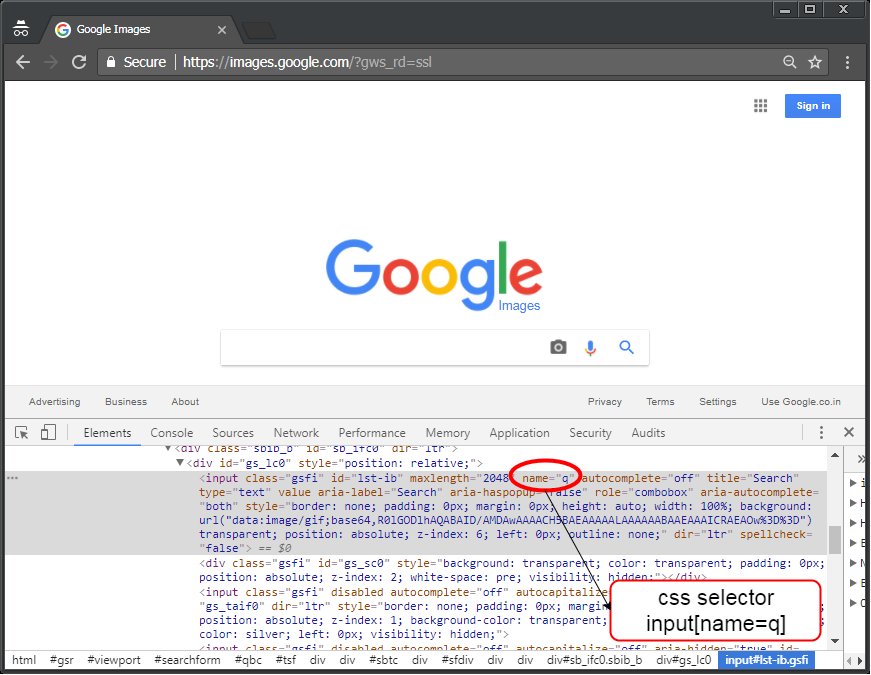
Focus on search box.
page.focustakes a css selector as parameter and focuses on that element on page.// Focus on input box await page.focus('input[name=q]');I was able to find the selector for the search box by using inspector (F12).
-
Now that search box is in focus, all we need to do is type ‘cats gif’ and press ‘enter’ which puppeteer provides simple APIs for.
 // Type some stuff
 await page.type('cat gifs');
 // Press enter
 await page.press('Enter');
Apart from searching for cat gifs, puppeteer can be used to take full page screenshots, generate PDF of pages, test UI on different viewport and anything else that a browser can do.
Also, once happy with the functioning of script, headless can be set to true so that puppeteer scripts can run without a GUI, on a VPS, in cloud or otherwise.
Conclusion
Puppeteer is extremely easy to start with and offers a comprehensive set of APIs. The library comes from team behind Google chrome and is under active development. It has the potential to become widely used for UI testing, web scrapping and browser based automation.
Some links:
Puppeteer > Examples > API reference
Here’s a good tutorial if you’re confused about all that async await stuff like I was: https://blog.risingstack.com/mastering-async-await-in-nodejs/